جميع المواضيع

الأربعاء، 27 أغسطس 2014


أفضل مواقع لتنسيق الالوان لمصممين مواقع الويب
 PSD/HTML Conversion: Code a Clean Business Website Design / تحويل شكل الموقع من الفوتوشوب الى موقع HTML 
How to Design a Clean Business Website with Photoshop / تصميم شكل القالب لموقع اعمال باستخدام الفوتوشوب
5 مكتبات لتأثيرات css ليكون تصميمك غني و ثري / 5 CSS Effects Libraries for Supercharging Your Designs

تصميم موقع ثلاثي الابعاد بطريقة احترافية و خطوة بخطوة / Create a Web Layout with 3D Elements using Photoshop


In this web design tutorial, you will discover a way to create a sleek and professional web page layout that incorporates the 3D Ribbon design trend, as well as some other captivating 3D elements, using  Photoshop.

Final Result

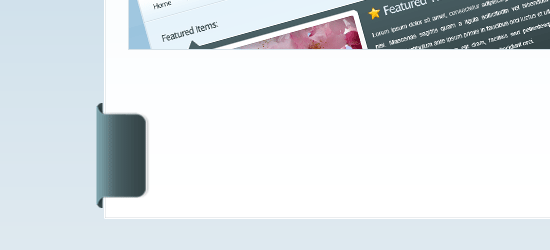
Here’s a preview of what we’re going to create. 
Final preview

Creating the Photoshop document

1 Start off by creating a new document (Ctrl+N); enter the dimensions 1200 pixelsby 1200 pixels.
Creating the Photoshop document

Making the Background layer editable

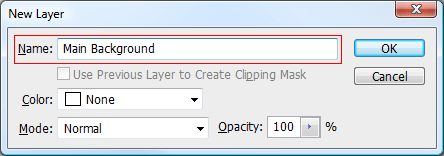
2 By default, Photoshop locks the Background layer so that you cannot edit it. To make it editable, double-click on your Background layer within the Layers Panel (press F7 to toggle the Layers Panel if it is not visible). Alternatively, you can right-click on the Background layer and choose to "Layers from Background". Once double clicked, you’ll be presented with a dialog box (as shown in the figure below). Enter a new name for your Background layer and press OK; doing this will enable us to edit our background layer.
Making the Background layer editable

Creating the background

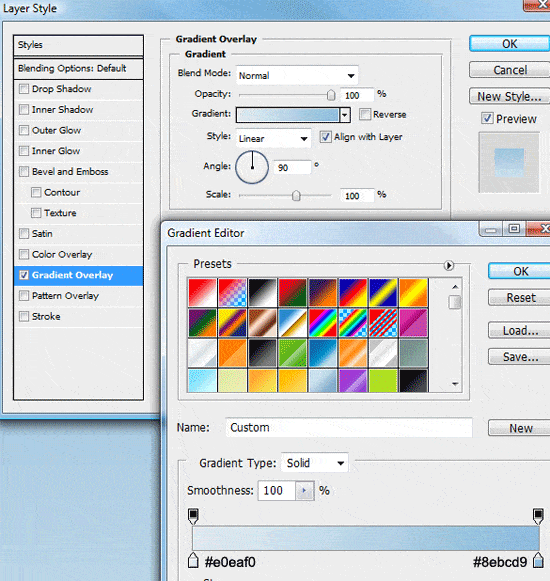
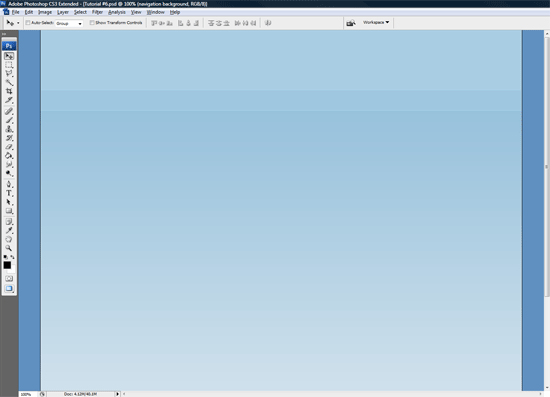
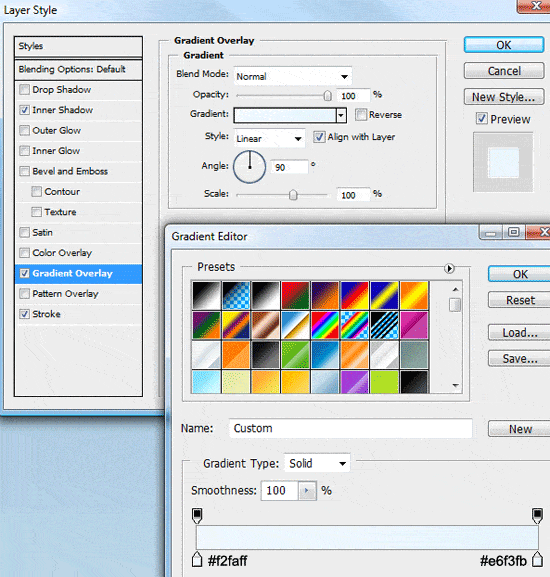
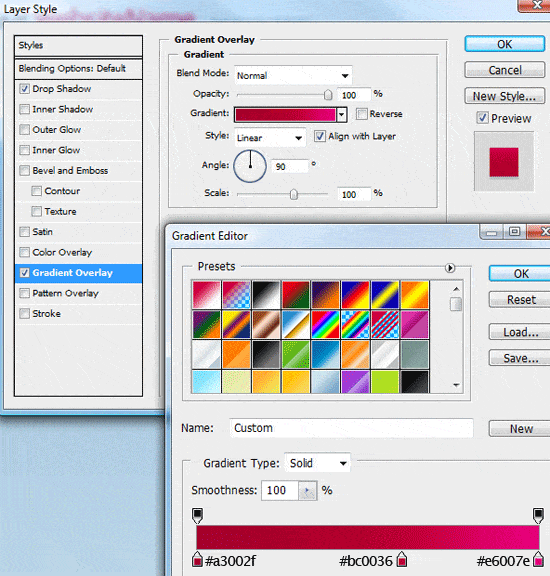
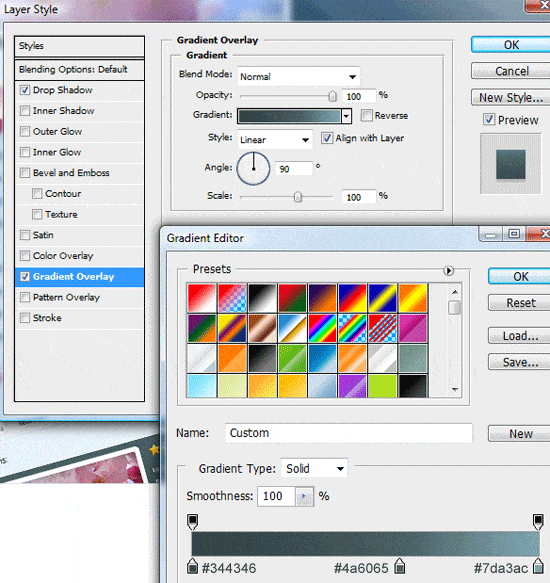
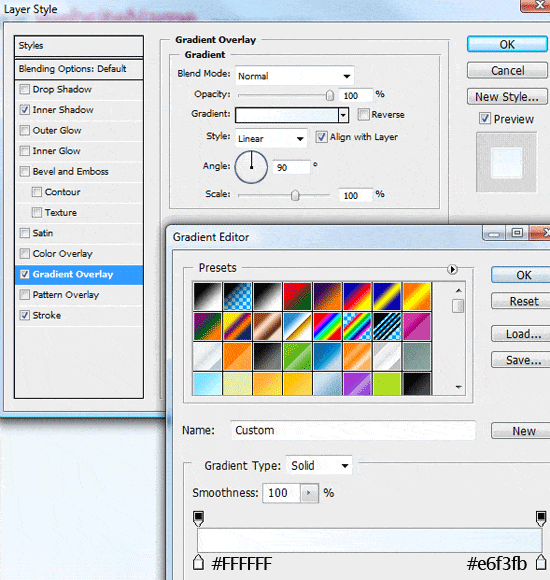
3 Now that our background layer is editable, double-click on the layer’s thumbnail to add a Gradient Overlay layer style; use the following figure as a guide on the layer style’s settings.
Creating the background
4 Create a new layer (Ctrl+Shift+N) named "header background". Choose the Rectangular Marquee Tool (M) in the Tools Panel and then make a selection across the top half the canvas; the selection should be about 150px in height and span the entire width of the canvas.
Creating the background
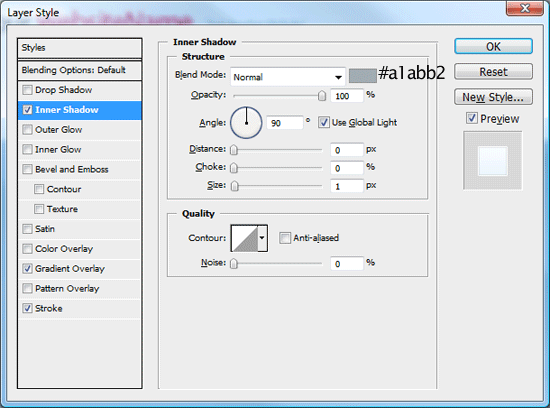
5 Fill the selection (Alt+Backspace) with any color then add these layer styles.
Creating the background
6 Create a new layer (Ctrl+Shift+N) labeled "navigation background". Repeat Steps 4 – 5, only this time the selection should be about 50px in height, still spanning the full width of our canvas; the selection should also be made directly underneath the last one.
Creating the background
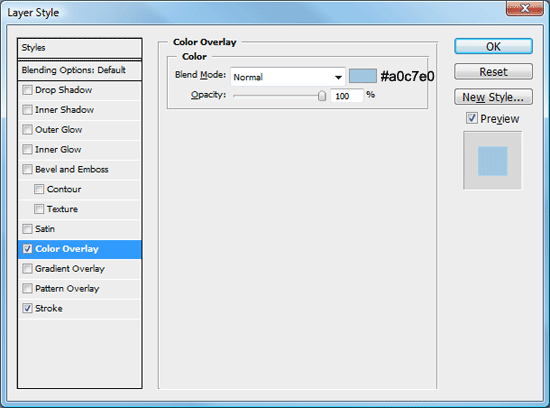
7 Fill the selection (Alt+Backspace) with any color then add a couple of layer styles (a Color Overlay and a Stroke layer style).
Creating the background
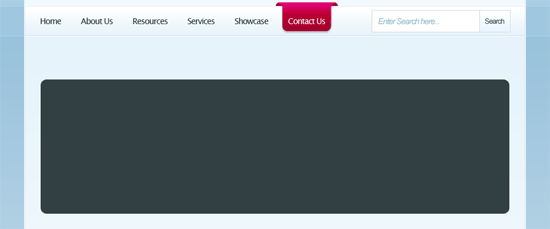
You should now have something like this.
Creating the background

Creating the Header

8 Create a new layer (Ctrl+Shift+N) labeled "header", get the Rectangular Marquee Tool (M) from the Tools Panel and then make a fixed sized selection that is 850pxwide and 150px in height.
Creating the Header
9 Place the selection in the middle of the canvas, making sure that the bottom of the selection ends on the stroke which is applied to the "navigation background" layer.
Creating the Header
10 Fill the selection (Alt+Backspace) with any color, and then add the following three layer styles.
Creating the Header
Creating the Header
Creating the Header

Adding the Header title

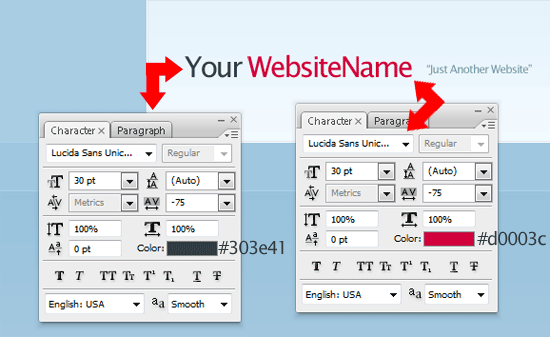
11 Add your website title and slogan on to the left side of the header by utilizing the Horizontal Type Tool (T). The settings and color codes are listed in the figure below.
Adding the Header title
You should have something like this.
Adding the Header title

Creating the Navigation bar

12 Create a new layer (Ctrl+Shift+N) labeled "navigation". Use the Rectangular Marquee Tool (M) to make a fixed selection that’s 850px wide and 50px in height.
Creating the Navigation bar
13 Make the selection directly underneath the header, then fill with any color.
Creating the Navigation bar
14 Now, add these three layer styles to your "navigation" layer.
Creating the Navigation bar
You should have something like this.
Creating the Navigation bar
15 Use the Horizontal Type Tool (T) to add your navigation links onto your navigation bar.
Creating the Navigation bar

Making the Navigation Hover button

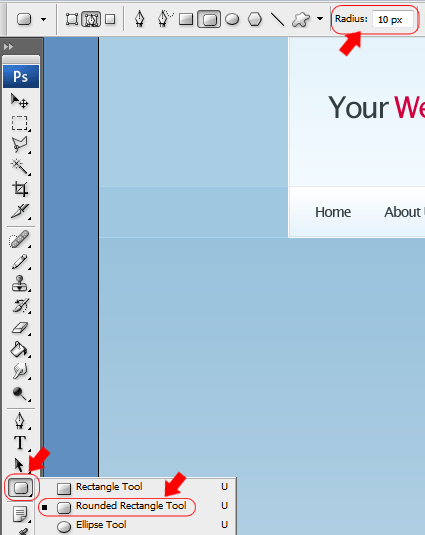
16 Select the Rounded Rectangle Tool (U) from the Tools Panel and set its Radius to10px.
Making the Navigation Hover button
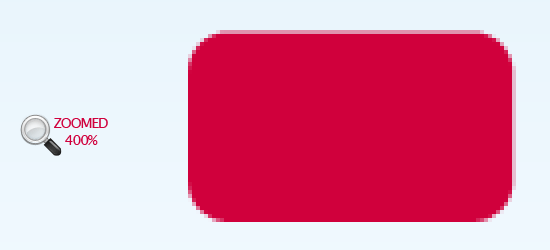
17 Draw out a small rectangle that’s about 80px x 50px.
Making the Navigation Hover button
18 Use the Rectangular Marquee Tool (M) to make a rectangle over the top half of the rectangle. Fill the rectangle the same color as the rounded rectangle.
Making the Navigation Hover button
19 Duplicate the shape by right clicking on the layer and choosing Duplicate Layer. Then rotate the duplicated layer 180 degrees using the Transform feature, Edit > Transform > Rotate 180o. Finally, place the shapes next to each other making sure there level; use the Move Tool (V) to move the shape around.
Making the Navigation Hover button
20 Make a selection around half of the duplicated shape using the Rectangular Marquee Tool (M). Once you’ve made a selection, hit the Del key to clear the area beneath the marquee selection.
Making the Navigation Hover button
21 Use the Move Tool (V) and your arrow keys to align the little shape next to the bigger shape, making sure they are not directly overlapping. Once moved into place, Ctrl + click your little shape layer’s thumbnail within the Layers Panel window to load a selection around it.
Making the Navigation Hover button
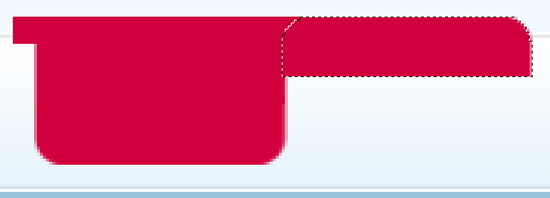
22 Switch to the bigger shape’s layer and hit the Del key to clear the area beneath it. Repeat the steps for the other side of the shape – and when you’re finished – you should have something like this.
Making the Navigation Hover button

Transforming the Hover button

23 Once you have your hover button you can delete the duplicated layer, and then rename the remaining layer "nav hover". Now, add these couple of layer styles to it.
Transforming the Hover button
24 Drag the "nav hover" layer underneath your navigation text layer. Shift the "nav button" layer behind one of your navigation links and then change the link texts color to white (#FFFFFF).
Transforming the Hover button
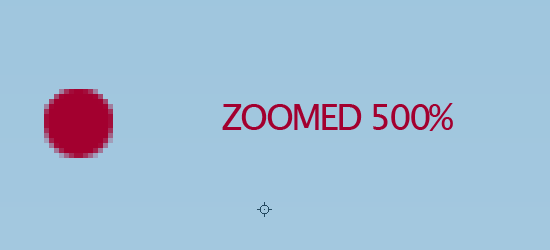
25 Underneath your "nav hover" button layer, create a new layer (Ctrl+Shift+N) called "nav hover extra". On this layer, create a small ellipse using the Elliptical Marquee Tool (M) and fill the ellipse with the color #A3002F.
Transforming the Hover button
26 Cut the ellipse in half by using the Rectangular Marquee Tool to make a selection of the bottom half, and deleting the bottom portion of it. Then move the half-ellipse under the rounded part of the nav button. If the ellipse hangs over the navigation, trim it some more. Once the ellipse is the correct size, duplicate its layer and place the duplicated one on the other side.
Transforming the Hover button
You should have something like this.
Transforming the Hover button

Creating the Content Area

27 Create a new layer (Ctrl + Shift + N) called "content area". Using the Rectangular Marquee Tool, create a selection 850px in width, same as our other boxes, and as high as you need depending on the amount of content your going to have; you can make it bigger or smaller later, as needed. Fill the selection with any color and then add these three layer styles.
Creating the Content Area
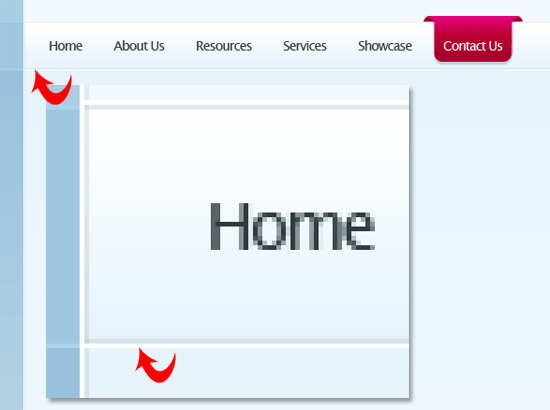
28 Drag the "content area" layer below the "navigation" layer and adjust the content area box using the Move Tool (V) so its looks like an indented line where the content area and navigation meet.
Creating the Content Area

Making the Search box graphic

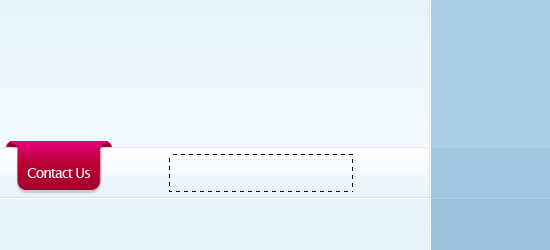
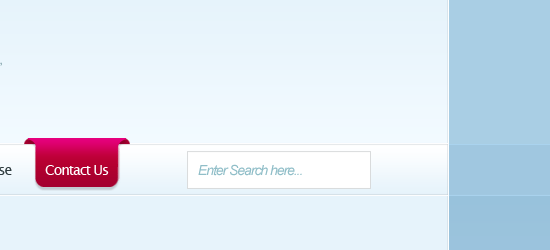
29 Create a new layer (Ctrl+Shift+N) called "search field" and create a rectangular marquee selection inside the navigation area on the right hand side using the Rectangular Marquee Tool (M).
Creating the Content Area
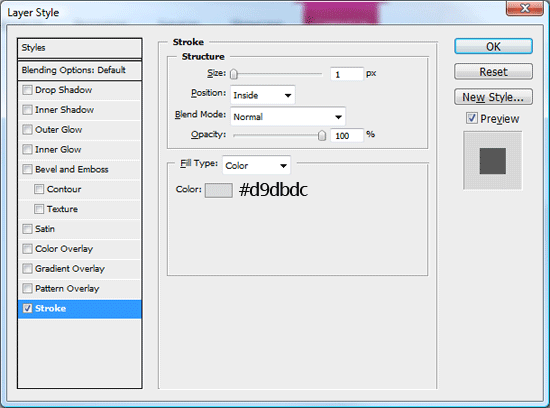
30 Fill the selection by choosing Edit > Fill (Shift+F5) with the color of white (#FFFFFF), and then add a Stroke layer style.
Creating the Content Area
31 Inside the dummy search field, add some text inside using the Horizontal Type Tool (T).
Creating the Content Area
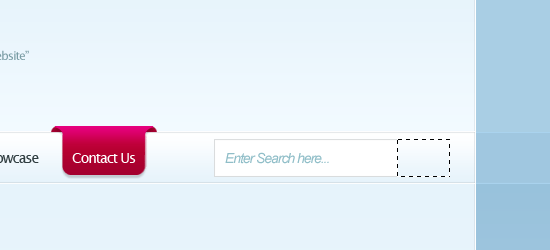
32 Directly next to the dummy search field, create another selection using the Rectangular Marquee Tool (M).
Creating the Content Area
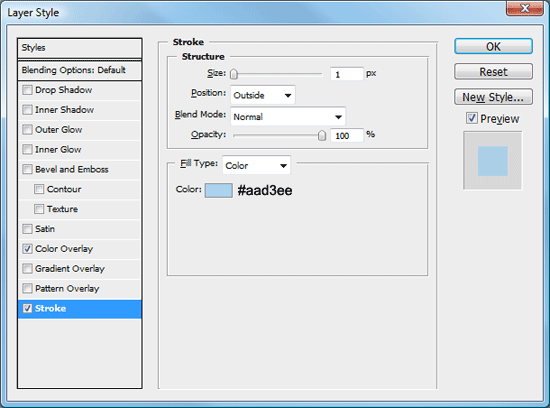
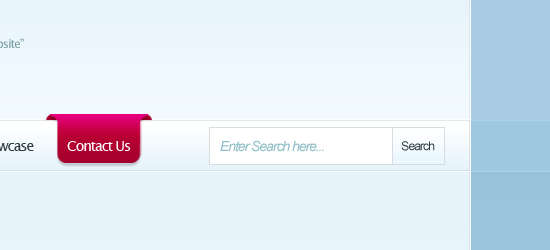
33 Fill the selection with any color then add a Gradient Overlay and Stroke layer style; use the following figures for guidance on their settings.
Making the Search box graphic
You should have something like this.
Creating the Featured Area

Creating the Featured Area

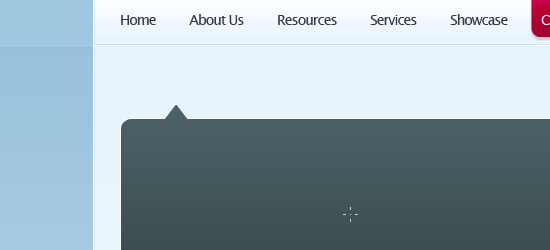
34 Create a new layer (Ctrl+Shift+N) called "featured area" and create a rounded rectangle area using the Rounded Rectangle Tool with a radius set at 10px.
Creating the Featured Area
35 Use the Polygonal Lasso Tool (L) to create a pointed arrow on the upper left side. Fill the arrow on the same layer with the same color as the rounded rectangle.
Creating the Featured Area
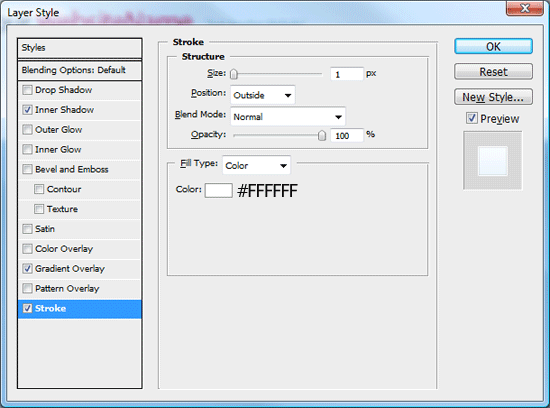
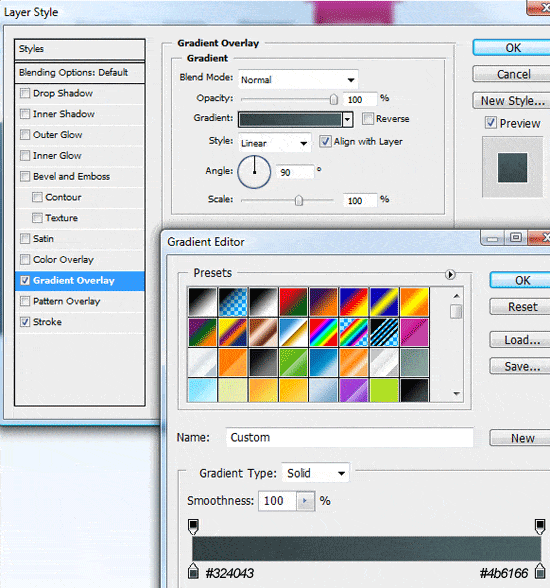
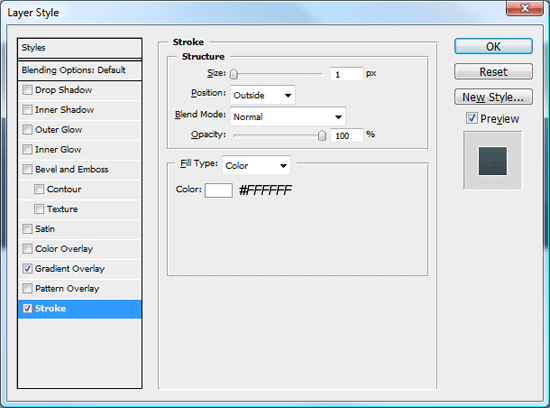
36 Now add a couple of layer styles (a Gradient Overlay and Stroke) to your featured area layer.
Creating the Featured Area

Filling in the Featured Area with content

37 Create a new layer (Ctrl+Shift+N) called "featured border" and using the Rounded Rectangle Tool (U), create a rectangular shape inside the featured area.
Featured Area content

38
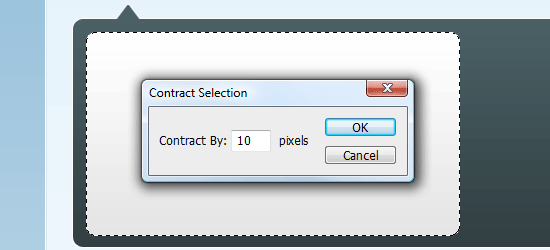
 Add a subtle gradient overlay to the featured border layer. Click the layer’s thumbnail whilst holding down the Ctrl key on the keyboard to load a selection around it, and then go to "Select > Modify > Contract". Contract the selection by 10px, and then press OK.
Filling in the Featured Area with content
39 Find an image/photo that you want to use (I used an image of some flowers), open it in Photoshop, and copy the image to your clipboard (Ctrl + C). Then with the contracted marquee selection that we made in the previous step still active, go to Edit > Paste Into (Shift+Ctrl+V). The image will then be paste inside the selection.
Filling in the Featured Area with content
40 Finish off the featured area with some dummy text and titles.
Filling in the Featured Area with content

Creating the content area’s 3D Ribbons

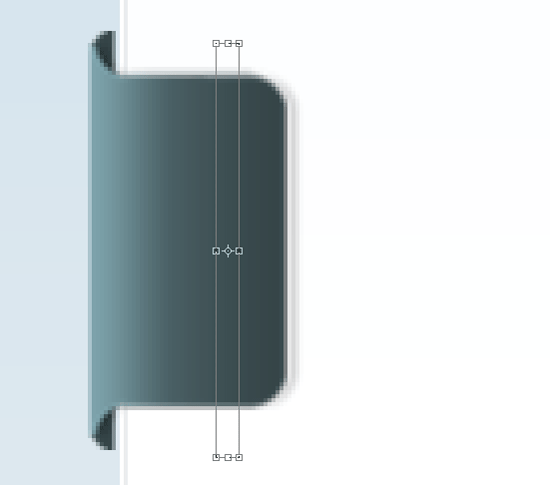
41 Use the same method as our navigation hover buttons to create the left par, only this time create the main overlapping part much longer and horizontally oriented instead of vertically oriented (jump back up to the Making the Navigation Hover buttonsection of the tutorial to refresh your memory if needed).
Creating the content area's 3D Ribbons
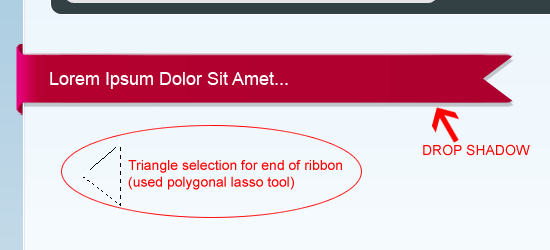
42 At the end of the ribbon (right-hand side), create a triangular shape using the Polygonal Lasso Tool (L) and use the Del key to remove the unwanted area. Finally, add a Drop Shadow layer style to this layer (use your preferred settings) and some dummy text.
Creating the content area's 3D Ribbons
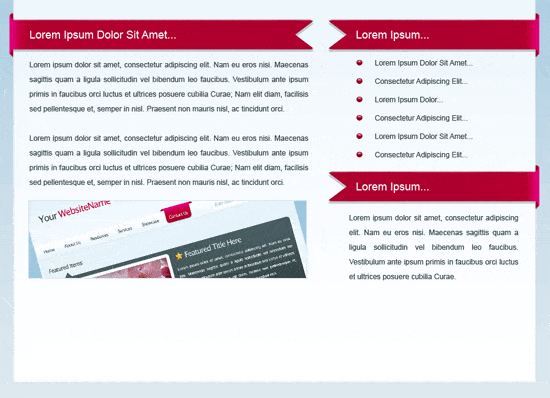
43 Duplicate the 3D ribbon layer and flip the duplicated layer by choosing Edit > Transform > Flip Horizontally. Use the Move Tool (V) to position it on the right; they will serve as the headings for the sidebar content.
Creating the content area's 3D Ribbons
44 Underneath each heading, add some dummy text and maybe an image or two.
Creating the content area's 3D Ribbons

Creating the Footer

45 Recreate the hover button again (alternatively, you can simply duplicate the layers of the hover button).
Creating the Footer
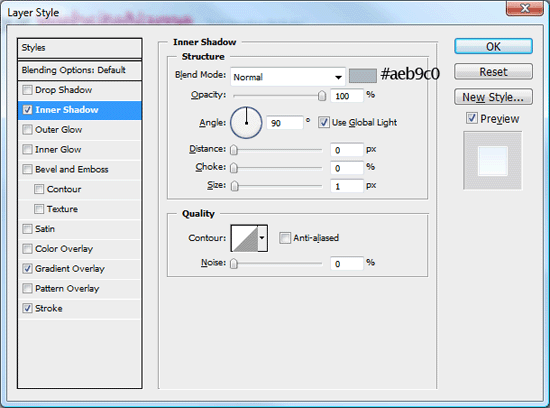
46 Replace the Gradient Overlay settings using the colors listed below.
Creating the Footer
47 Merge them into one layer and rotate it via Edit > Transform > Rotate 90o CCW. Move the object on the left side of the layout.
Creating the Footer
48 Duplicate the shape again and flip it horizontally using Edit > Transform > Flip Horizontally. Move the shape across on to the other side of the layout.
Creating the Footer
49 Merge both shapes into one layer (Ctrl+E), zoom (Z) into any one of the shapes, and make a rectangular selection just like in the figure below, and choose Edit > Free Transform (Ctrl+T).
Creating the Footer
50 Select the middle anchor point and drag across to the other side of the canvas.
Creating the Footer
You should have something like this.
Creating the Footer
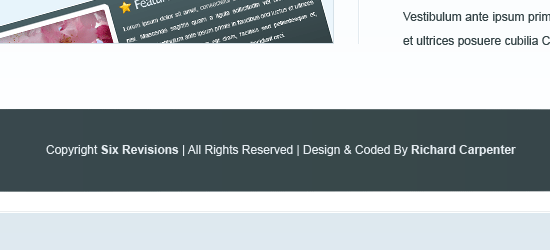
51 Finally, using the Horizontal Type Tool (T) add your footer information
Creating the Footer

The end !

لتحميل ملف PSD للتصميم من هنا 


تصميم موقع ثلاثي الابعاد بطريقة احترافية و خطوة بخطوة / Create a Web Layout with 3D Elements using Photoshop

نشر في : الأربعاء, أغسطس 27, 2014  |  من طرف Unknown

الثلاثاء، 26 أغسطس 2014


اسلوب دراسة يجعلك تتفوق في الامتحان اذا كان دوائر (Multiple choice )
هل لديك مشكلة لان تخصصك بالانجليزية !!!
الطريقة الصحيحة للتعامل مع الخطة الدراسية
مجالات عمل و الفروق بين تخصصات كلية تكنولوجيا المعلومات


1. علم الحاسوب :  هو العلم الذي يدرس الحوسبة ومعالجة البيانات والنظريات والتطبيقات التي تشكل الأساس لأتمتة نقل المعلومات ويركز التخصص على أساسيات علوم الحاسوب كلغات البرمجة وقواعد البيانات والمترجمات وهيكلة البيانات وتصميم البرمجيات المختلفة ونظم التشغيل.
       مجالات العمل : مبرمج ومحلل نظم، الشركات والمؤسسات والبنوك والجامعات، التدريس ومشرف مختبر، مندوب مبيعات                 لمعدات وبرمجيات الحاسوب.

2. نظم المعلومات الحاسوبية : يهدف التخصص إلى تخريج وتأهيل الطلبة على حوسبة نظم المعلومات في المجالات المختلفة المحاسبية والمالية والإدارية والطبية الخ، والهدف منه تنمية قدرات الطالب على التخطيط والتصميم والتنفيذ والتطوير وإدارة نظم المعلومات والتي تخدم المؤسسات المختلفة كالبنوك والجامعات والمستشفيات.
       مجالات العمل : التحليل والبرمجة، تصميم نظم التجارة الالكترونية، التدريس ومشرف مختبر، شركات الحاسوب الخاصة،                  مجال الاتصالات وتكنولوجيا المعلومات.

3. نظم المعلومات الادارية : يهدف التخصص إلى استخدام التطبيقات المحوسبة في العمليات الإدارية والمزج بين النظريات الإدارية المختلفة والتطبيق الميداني، وتعريف الطالب بقيمة مفهوم نظم المعلومات الإدارية في النشاطات الإدارية.
       مجالات العمل : التدريس، مدخل بيانات، محلل نظم ومواقع على الانترنت، المؤسسات العامة والخاصة والقطاع المصرفي.

4. تكنولوجيا معلومات الاعمال : يهدف التخصص إلى تكامل تكنولوجيا المعلومات مع متطلبات عمليات الأعمال لتوفير المعلومات التي يحتاجونها لتحقيق أهداف هذه المنظمات، ويقوم التخصص بتزويد الطلبة بتطبيقات الحاسوب في مجال الإدارة بمواد تتناول البرمجة الهيكلية وقواعد البيانات وتطبيقات الانترنت.
       مجالات العمل : تصميم وتطوير مواقع الانترنت، التجارة الالكترونية، البرمجة، التدريس.

5. هندسة البرمجيات : يهدف التخصص إلى تطوير مجموعة من الأسس والقواعد التي تؤدي إلى تحسين طرق تصميم البرمجيات بطريقة تلبي احتياجات المستخدمين، وهو لا يهتم بكتابة البرنامج نفسه، بل يهتم بتحسين عملية تطوير وضع البرنامج، والأخذ بعين الاعتبار القدرة على تطوير البرنامج بسهولة لاحقاً ويركز التخصص على بناء وصيانة البرامج الضخمة كبرامج إدارة الشبكات والمصانع.
       مجالات العمل : إدارة المشاريع البرمجية ، مهندس نظم ومحلل ومصمم، مهندس صيانة البرامج، مشرف مختبر، التدريس،              تصميم مواقع الانترنت.


مجالات عمل و الفروق بين تخصصات كلية تكنولوجيا المعلومات

نشر في : الثلاثاء, أغسطس 26, 2014  |  من طرف Unknown

السبت، 23 أغسطس 2014


Mapping the entity Relationship Diagram (ERD) to Tables الجزء الاول من دورة

هذه الدورة عبارة عن جزئين :
الجزء الاول سيتم التعرف على مكونات ERD بالتفصيل .
الجزء الثاني سيتم التعرف على طريقة تحويل ERD الى Tables .


تابعنا الجزء الاول من هذه الدورة و تعرف معنا على جميع مكونات ERD ...
سيتم تطبيق هذه الدورة على مثال ERD الموجود في الصورة ادناه ..

في هذا المثال جميع انواع Attribute و Entity و Relationship ,, لذا سيتم التطبيق عليه لتغطية كامل الافكار .

1. Entity : تمثل اسم Table الذي يمثل شي او مسمى لشيء في الواقع الحقيقي التي توصف في قاعدة البيانات DB و تكون على الشكل مستطيل كما في الصورة , بها سترتبط  Attribute و Relationship.
Entity
Entity
2. Weak Entity : هي entity لكن لا تحتوي على unique attribute لذا يجب ربط Foreign key  مع Attribute اخرى  لنكون Primary Key لهذه entity و تكون على شكل مستطيلين داخل بعضهما كما في الصورة ادناه .

       Primary Key : هو Attribute لكن لا تحتوي تكرار في القيم و لا يمكن ان تحتوي على قيم Null لذا يتم تميز بها record                                  لهذا entity يرمز له بـ PK .
       Foreign key : هو Attribute يكون PK في entity اخر و تستخدم للربط بين entities و يرمز له بـ FK .

Weak Entity
Weak Entity
3. Relationship : تمثل عملية الترابط بين entity و تكون على شكل معين كمان في الصورة .
Relationship
Relationship
    تقسم Relationship الى 3 انواع و هي :
        one to one :  في هذه الحالة يرتبط record (صف) واحد من entity الاولى  مع record (صف) واحد من entity الثانية و                تكون على شكل 1:1 .
        one to many : في هذه الحالة يرتبط مجموعة records (صفوف) من entity الاولى  مع record (صف) واحد من entity                الثانية وتكون على شكل 1:M .
        many to many : في هذه الحالة يرتبط مجموعة records (صفوف) من entity الاولى  مع مجموعة records (صفوف)                من entity الثانية وتكون على شكل N:M .

4.  Identifying Relationship : هي relationship لكن تربط بين weak entity و owner entity و تكون على شكل معينين داخل بعضهما كما في الصورة . 
        
          Owner entity : هي entity التي على الطرف الاخر من relationship و تكون مرتبطة مع weak entity.
Identifying Relationship
5. Attribute : هي عبارة عن صفات لـ entity و تكون على شكل بيضوي كما في الصورة .
Attribute
Attribute
    و قد تكون هذه Attribute تمثل PK عندها نضع تحت اسم Attribute خط كما في الصورة .
PK Attribute
PK Attribute
   و قد تكون هذه Attribute تحتوي على اكثر من قيمة في الوقت الواحد و تسمى Multivalued Attribute و تكون على الشكل      الذي بالصورة .
 Multivalued Attribute
 Multivalued Attribute
و قد يتم تقسم Attribute الى sub part و عندها تسمى Composite Attribute و تكون على الشكل الظاهر في الصورة .
Composite Attribute
Composite Attribute
و اخيرا توجد Attribute يعتمد احتساب قيمها على Attribute اخرى و تسمى هذه Attribute بـ Derived Attribute .

Derived Attribute
Derived Attribute
انتهى الجزء الاول من هذه الدورة .. انتظرنا في الجزء الثاني و الذي سيتم شرح كيفية تحويل ERD الى Tables.

لانتأكد من تحقق اهداف الدرس ,, كتب بتعليق مثال على كل مكون من ERD الذي سيتم تطبيق الدورة عليه ..


دورات اخرى قد تستفيد منها :
أفضل مواقع لتنسيق الالوان لمصممين مواقع الويب
5 مكتبات لتأثيرات css ليكون تصميمك غني و ثري / 5 CSS Effects Libraries for Supercharging Your Designs
افضل 20 موقع لتعلم css3
دوره برمجه الاندرويد من الصفر الى الاحتراف
درس عمل غلاف للفيس بوك للمبتدئين 
كيفيه برمجه اضافات جوجل كروم (الجزء الرابع) / Google Extention
كيفيه برمجه اضافات جوجل كروم (الجزء الثالث) / Google Extention
كيفيه برمجه اضافات جوجل كروم (الجزء الثاني) / Google Extention
كيفيه برمجه اضافات جوجل كروم (الجزء الاول) / Google Extension
تحويل الصور الى كرتون بالفوتوشوب .. بالفيديو
PSD/HTML Conversion: Code a Clean Business Website Design / تحويل شكل الموقع من الفوتوشوب الى موقع HTML
اسرع و افضل طريقة لتجميل الوجه بالفوتوشوب / Super Fast and Easy Facial Retouching
How to Design a Clean Business Website with Photoshop / تصميم شكل القالب لموقع اعمال باستخدام الفوتوشوب
5 مبادئ ليكون تصميمك ناجح (تصميم الشعارات)


Mapping the entity Relationship Diagram (ERD) to Tables الجزء الاول من دورة

نشر في : السبت, أغسطس 23, 2014  |  من طرف Unknown


تجربة شاب جامعي 3 ... بقلم معتصم عبد الفتاح كراسنة


"تجربة شاب جامعي 1"... تحدثت في اول قصة من هذه السلسلة عن علاقة بين صديقنا الشاب وأول حب له ، وكانت نهاية العلاقة سيئة وغير متوقعة  وكانت المشكلة بالفتاة ولن اطيل بالحديث عن هذه التجربة لأنني سوف اتحدث لاحقا عن بعض التطورات لهذه القصة في الأسطر القادمة.

"تجربة شاب جامعي 2"... تحدثت بهذه القصة عن ثاني علاقة لصديقنا الشاب وقد كانت افضل علاقة لكنها انتهت بوقت قصير وبشكل مفاجئ ، وتركت اثرا لم ولن تمحوه الايام ، ولم تكن الفتاة او الشاب ظالمين انما لم يكن لهما نصيب ببعضهما ، ففي زماننا هذا ارادتنا شيء وما يحدث لنا شيء اخر وبالنهاية يأتي من يقول انه القدر والقسمة والنصيب ، يظلمون ويؤذون ويجرحون وبعد هذا يقولون انه القدر ، الى متى سنبقى نعزو فشلنا وسوء انفسنا الى القدر؟ هذا سؤال اجيبو عليه بينكم وبين انفسكم.


في هذه القصة لن اتكلم عن علاقة حب كما يتوقع اغلب القراء ، انما سأتكلم عن علاقة صداقة قوية كانت افضل بكثير من اي علاقة حب كانت ستأتي بعد الذي حصل مع صديقنا الشاب في القصتين السابقتين ، وانا لا اروج لعلاقات الصداقة بين الجنسين لكنها تجربة ، لأن اغلب علاقات الحب الفاشلة تبدأ من علاقة صداقة ثم لا يستطيع احد الطرفين السيطرة على نفسه ومشاعره وتتحول الصداقة الى حب وهذا ما يجعل الأغلب يؤمن بأنه لا توجد صداقة بين الجنسين.

خرج صديقنا الشاب من التجربة السابقة فارغا تماما ، شخص لا يعلم ما يفعل ، خسر من احب واراد ان يعوض خسارته بأي طريقه لكن هيهات ، الذي فقد كان اكبر من اي شيء وُجد بعده ، بدأ يتصرف بشكل عفوي وجاهل كما يتصرف اغلب الشبان حين يخرجون من علاقة حب فاشلة بإعتقادهم ان فتاة اخرى ستنسيهم السابقة وكما نسمع ونرى الشبان حين يرون صديقا لهم قد خسر من يحب ويقولون له انه يستطيع تعويضها ويوجد الكثير غيرها ، كلام فارغ.

9 اشهر مرت حتى هذه اللحظة ، ولم ينسى ، تعرف على الكثير من الفتيات لكن لم تلفت انتباهه اي واحدة ، ولم تساعده اي واحدة منهن على النسيان ، لأنه وبكل بساطه ما زالت غاليته تعيش في احلامه وان كانت قد اختفت من واقعه ، الا واحدة كان لها اثر كبير على صديقنا الشاب وكان بها شيء مميز لكنها لا تصلح ان تكون اكثر من صديقة وهذا ما اكتشفه وتداركه صديقنا الشاب.

كانت فتاة عملية جدا ، تحب نفسها ، ملتزمة ، ذكية ، وأهم صفة "صادقة وواضحة جدا" ، وهذه الصفة لاحظ الشاب اهميتها بعد ما حصل معه في اول تجربة ، مرت الايام حتى اصبحت جزءا اساسيا من يومه وحياته ، يتحدثان كثيرا ويتشاوران كثيرا ويخرجان ما بقلبهما لبعضهما ، حتى خاف الشاب من الوقوع في الحب .

لكل علاقة حدود ، الأصدقاء لا يتغازلون ، الأحبه يفعلون ، الأصدقاء لا يقضيان يومهما كاملا مع بعضهما ، الأحبه يفعلون ، هذه الشكليات التي ينظر اليها الأغلبية ويميزون بها بين الصديقة والحبيبة ، ولا احد يتطلع على ما في قلب الطرفين ، صديقنا الشاب لم يستطع ان يحب لانه لم ينسى وصديقته ايضا لم تنسى ما مرت به سابقا ، بالإضافه الا انهما لا يصلحان ان يكونا اكثر من اصدقاء لعدة اسباب منها ، ان الفتاة اقتربت من انهاء دراستها وصديقنا الشاب بقي لديه الكثير اذا فهو لا يستطيع الزواج بها وكما ذكرت في اول تجربة ان علاقة الحب التي تنتهي بدون زواج فهي فاشلة.

من الأسباب الاخرى ان طريقة التفكير وادارة الامور ووجهات النظر بينهم كانت تختلف كثيرا ولا يتفقان في كل شيء ومع ذلك كانت علاقتهما قوية جدا ، ومع الوقت اصبحا مقربين جدا من بعضهما وكل من يراهما يعتقد انهما حبيبين وليسا صديقين ولا احد يصدق الشاب حين يقول انها مجرد صديقة ، انا شخصيا اقترح على صديقنا الشاب ان ينسى امر كلمة "مجرد"  فهي لم تكن كذلك  بل كانت شيئا اساسيا في حياته وما زالت.


في الصباح الباكر من احد الأيام ، وبينما يجلس صدقنا الشاب مع قهوته وسيجارته على انغام فيروز وإذا باتصال هاتفي يقاطع لحظته الخاصة ، مفاده ان التي كان يحبها في التجربة الاولى قد ضربت من قبل حبيبها امام البشر ، انهى صديقنا اتصاله وقد انتابته غصة مع انه كان يكرهها ، لأنه لم يكن يريد لها الأذية او الفضيحة وليست الشماتة من اخلاقه بل كل ما كان يريد هو ان تعلم وتتعلم ، وفي مساء اليوم ذاته علم ان سبب هذه الضربة التي تلقتها هي خيانتها لحبيبها ذاك او ما يشابه الخيانة.

ليس من الرجولة ضرب فتاة مهما كانت الأسباب ، هكذا تربى صديقنا الشاب وهذا مفاد ما نشره على احد مواقع التواصل الاجتماعي الخاصة به ، لكنه لم يستغرب الموقف كثيرا فهو لا يتوقع اقل من هذا منه او منها ، بعد فترة ليست بطويلة تحدثت الفتاة مع احد صديقاتها التي على تواصل بصديقنا الشاب واوصلت له فكرة ان الموقف الذي وصل اليه كذب وانها لم تضرب وأن حبيبها او اي شاب لا ولن يجرؤ على لمسها ، صمت صديقنا الشاب ثم دخل في نوبة من الضحك واجاب : انا لا يهمني ان كان قد ضربها ام لا ، كيف علمت بما وصلني ، لم ما زالت تتابع اخباري وما انشر؟!

وبعد هذا توالت عدة من المواقف لا يفهم او يعلم منها سوى ان الفتاة التي في التجربة الاولى لم تنسى وتحاول العودة ، انا شخصيا لا اعلم لماذا ، لكن صديقنا الشاب كان له رأي اخر ، هذه الفتاة مريضة ولا تعلم ما تفعل ، اعتادت ان تهجر الشاب ثم يبقى يحاول العودة اليها ، اعتادت ان تذل اي شاب عرفته بأي طريقة وتجعله كالعبد واقفا عند بابها ، لا يريد سوى رضاها ويريدها بأي ثمن ، وهي تبقى في تعنتها وكبريائها المزعوم ، الا مع صديقنا الشاب الذي في هذه التجارب ، فهو حزن عليها فترة بسيطة ثم علم انها لا تستحق ان تجعله ضعيفا او تجعل منه اضحوكة  "انا لست ضعيفا ولست نصفا ولست تابعا" هذا كان رأيه تجاهها ، ما لبث ان تركها وعلم بارتباطها بفترة بسيطة حتى دخل في "تجربة شاب جامعي 2" وحتى هذه اللحظة لم يرضخ لها ذليلا ولم يعرها اي انتباه ، وهي تريد منه ان يعود اليها ويلاحقها لكي تثبت انه لا يوجد شاب لا تستطيع اذلاله وتجعله يخضع امام جمال عينيها ، هذا هو المرض النفسي بعينه .

بعد كل هذا .. اصبح صديقنا الشاب في حيرة من امره ، هل يستمع الى نداء القلب الذي احس بعجز تلك الفتاة ويساعدها بشكل غير مباشر أم يستمع الى نداء العقل ولا يعرها أي انتباه بسبب ما فعلت ، خاصة انه لم يعد يثق بمن حوله ، وهنا اتى دور صديقته العزيزة في قصتنا ، فإقترحت عليه ان يحادث تلك الفتاة  ويعلم منها ما تريد ، قصة انتهت قبل سنة لم ما زالت تحدث مواقف سخيفة بسببها ، واقترحت عليه ان يساعدها في اصلاح حالها اذا استطاع لأنها تعلم ان لديه قدرة خارقة على الاقناع وامتلاك القلوب ، فكانت اجابته بأبيات من الشعر:

                   لقد أسمعت لو ناديت حيا                   ولكن لا حياة لمن تنادي
                   ولو نار نفخت بها أضاءت                 ولكن انت تنفخ في الرماد

لم اكن اتوقع في حياتي ان تنجح مسألة الصداقة الحقيقية بين الجنسين ، وانا ارى ان ما حدث في هذه القصة هو شيء نادر الحدوث واعود واكرر انا لا اروج او احث على علاقة الصداقة او اي علاقة بين الجنسين ، لكن اذا كان لا بد ، فمن الأفضل ان تكون علاقة بحدود ويسيطر كل من الطرفين على مشاعره ، لأنه لو تحولت علاقة صديقنا في هذه القصة الى حب لكانت فشلا اكبر واعظم من التجربتين السابقتين لأن الشاب لم ينسى التي احبها سابقا في التجربة الثانية وصديقته هذه لا تنفع اكثر من صديقة لعدة اسباب ذكرتها سابقا.

الكثير من الشبان والفتيات يمرون بتجارب قاسية ، وبعد انتهاء هذه التجارب يذهبون لتصحيح خطأهم السابق بخطأ اكبر ويريدون نسيان ما حصل معهم بحب جديد او بشخص جديد ولكن لا يعلمون ان من يحب بصدق لا يمكن ان ينسى بأي شكل من الأشكال ، منهم من يقع ضحية ومنهم من يوقع ضحية .

الكثير من الاشخاص يظلمون ويؤذون ويقومون باتخاذ قرارات دون مراعاة لمشاعر الذين يتعاملون معه بإعتقادهم ان المشاعر لا اهمية لها ثم يقولون انه القدر ، انه النصيب ، يا اشباه الرجال ، يا اشباه النساء ، يا اشباه البشر ، القدر بريء من الظلم بكل انواعه ، ولمن يعتقد ان الله سيتوب عليه لظلمه لشخص فهو احمق ، لأن الله يمكن ان يغفر ويسامح في حقه من صلاة وغيرها لأنه في غنى عنها وقد اوجدها لراحة البشر وليس لحاجته لها ، لكنه لا يسامح في حق عباده اذا لم يسامحوا هم.

وفي الختام اود ان اذكر اخواني بعدة اشياء ، اولا ، لا تحاول نسيان شخص عن طريق شخص لأنه يمكن ان تظلمه بدون قصد ، ثانيا ، لا تعتقد ان اي فتاة تعرفها او اي شاب تعرفينه يصلح لكي يكون حبيب ، فالحبيب هو شريك الحياة وعند اختياره يجب معرفة كل شيء عنه ودراسة هذا الشيء بشكل كبير وجدي لأن الدخول في علاقة حب والخروج منها ليس بالأمر السهل على اي شخص عاقل ، ثالثا ، انا لا اروج لأي نوع من العلاقات لكن ان وجدت لا بد من اخذ مشاعر الاخرين بعين الاعتبار وبنفس الوقت تحكيم العقل ، لأن صديقنا الشاب عرف الكثير من الفتيات والكثير منهن احببنه وقبل فترة قصيرة صارحته احداهن بحبها له لكنه رفض بطريقة مقنعة وسلسة لأنه يعلم انه لم ينسى ولو وافق لظلمها بعد فترة بسيطة وبهذا يكون قد صنع من الصديقة عدوة .

اتمنى لكم كل التوفيق والسداد في جميع شؤون حياتكم ، واتمنى ان تكونو قد استفدتم مما عرضت لكم اليوم

أخوكم المحب
معتصم عبد الفتاح كراسنه

ملاحظة : القصة ليست عن تجربة شخصية انما لتجربة شخص عزيز  والمقصود منها العبرة وليس اكثر واتمنى ان تنال اعجابكم :)


تجربة شاب جامعي 3 ... بقلم معتصم عبد الفتاح كراسنة

نشر في : السبت, أغسطس 23, 2014  |  من طرف Unknown

تابعنا ليصلك جديدنا

انت الزائر رقم

Translate

back to top